环境说明

ROS版本:ROS Kinetic Kame

Ubuntu版本:Ubuntu 16.04.6 LTS,(lsb_release -a

Python版本:Python 2.7.12

CMake 版本:3.5.1

前文已经讲过

  1. ROS 工作空间和包
  2. ROS 消息(msg)和服务(srv)
  3. ROS 概述

以上是这篇文章的基础

以下所有文件都创建在 ws 的工作空间下

topic通讯机制

ROS 
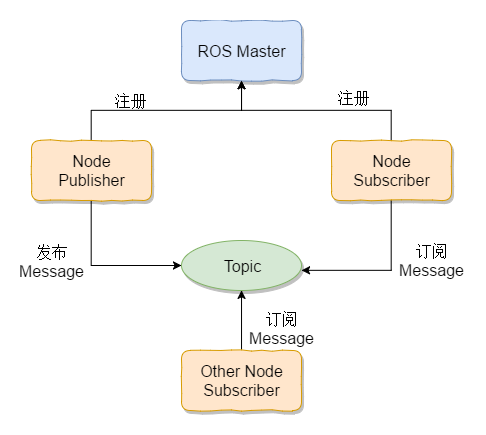
中节点间通信,其中一方为消息的发布者,定义为Publisher,另一方为消息的订阅者,定义为Subscriber。考虑到消息需要广泛传播,ROS在设计中没有将该中设计为点对点的单一传递,而是有发布者发布数据到Topic中,想要获得消息的任何一方都可以在 topic 中去获取数据,类似于udp的广播机制,大致的通讯原理如下图:

ros_topic

使用命令catkin_create_pkg demo_topic roscpp rospy rosmsg 创建一个名为demo_topic的包

创建只发布std消息的节点

c++版本

  1. src目录下创建一个 publisher.cc 文件,将以下代码添加到该文件中
1
2
3
4
5
6
7
8
9
10
11
12
13
14
15
16
// 导入 ros 头文件
#include <ros/ros.h>

int main(int argc, char **argv) {
// 创建 ros 的节点名称
char node_name[] = "demo_publisher";
// 初始化 ros 节点
ros::init(argc, argv, node_name);
// 创建一个节点对象
ros::NodeHandle node;
// TODO 将业务逻辑写在此处

// 开启 ros 的运行时循环
ros::spin();
return 0;
}
  1. CMakeLists.txt 中添加 add_executabletarget_link_libraries
1
2
3
4
5
6
7
8
9
10
# 添加一个可执行程序
add_executable(
demo_publisher
src/publisher.cc
)
# 添加该可执行程序的依赖库
target_link_libraries(
demo_publisher
${catkin_LIBRARIES}
)
  1. 创建 Publisher 对象

    1. 导入要发送的消息的头文件
    1
    2
    // 先使用 std 库中的简易消息
    #include "std_msgs/String.h
    1. 创建对象,并发送消息
    1
    2
    3
    4
    5
    6
    7
    8
    9
    10
    11
    12
    13
    // 创建一个 topic 的名称
    char topic_name[] = "demo_topic";
    // 获取一个 publisher 的对象
    const ros::Publisher &pub =
    node.advertise<std_msgs::String>(topic_name, 1000);
    // 创建一个要发送的消息对象
    std_msgs::String str;
    // 填充要发送的数据
    str.data = "I send a message";
    // 使用 publisher 发送该消息
    while (ros::ok()) {
    pub.publish(str);
    }
  2. 编译该节点,在工作空间目录下

1
catkin_make

Python版本

  1. package 目录下创建一个名为 scripts 的文件夹
  2. 创建一个名为 publisher.py 的文件,将以下代码添加到该文件中
1
2
3
4
5
6
7
8
9
10
11
12
13
14
#!/usr/bin/env python
# coding: utf-8

# 导入 rospy 依赖
import rospy

if __name__ == "__main__":
# 节点名称
node_name = "demo_publisher"
# 初始化 ros 节点
rospy.init_node(node_name)
# todo 将业务逻辑写在此处
# 开启 ros 运行时循环
rospy.spin()
  1. 创建 Publisher 对象

    1. 导入要发送的消息的头文件
    1
    2
    # 先使用 std 库中的简易消息
    from std_msgs.msg import String
    1. 创建对象,并发送消息
    1
    2
    3
    4
    5
    6
    7
    8
    9
    10
    11
    # 创建一个 topic 名称
    topic_name = "demo_topic"
    # 创建一个发布者
    pub = rospy.Publisher(topic_name, String, queue_size=1000)
    # 创建一个要发布的消息
    string = String()
    # 填充要发布的消息
    string.data = "I send a message"
    # 使用 publisher 发送该消息
    while not rospy.is_shutdown():
    pub.publish(string)
  2. 给 publisher.py 赋予可执行权限

1
chmod a+x src/demo_topic/scripts/publisher.py

使用 rqt_topic 工具调试

  1. 将当前工作空间的环境变量添加到bashzsh
1
2
3
# 根据使用不同的 shell 使用不同的环境变量,两者选其一
source devel/setup.bash # 使用 bash
source devel/setup.zsh # 使用 zsh
  1. 运行 demo_publisher

    1. c++ 程序
    1
    rosrun demo_topic demo_publisher
    1. python 程序
    1
    rosrun demo_topic publisher.py
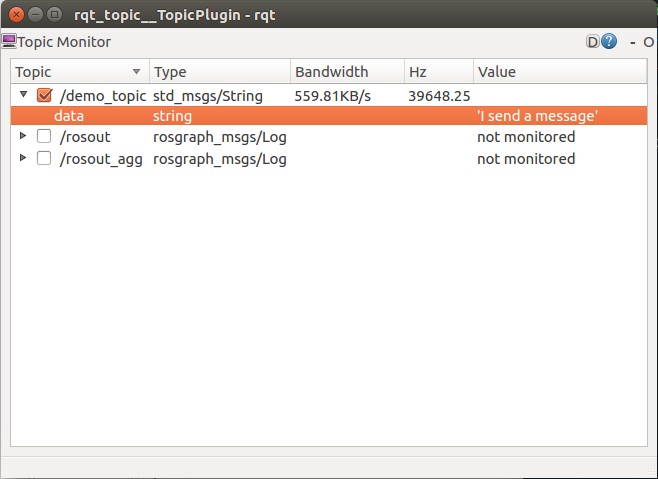
  2. 打开 rqt_topic 工具

1
rosrun rqt_topic rqt_topic
  1. 勾选 demo_topic,结果如下

rqt_topic1

创建发布自定义消息的节点

我们使用在ros消息讲过的demo_msgs包中的Team.msg来传输数据

c++版本

  1. src目录下创建一个 publisher1.cc 文件,将以下代码添加到该文件中
1
2
3
4
5
6
7
8
9
10
11
12
13
14
15
16
// 导入 ros 头文件
#include <ros/ros.h>

int main(int argc, char **argv) {
// 创建 ros 的节点名称
char node_name[] = "demo_publisher";
// 初始化 ros 节点
ros::init(argc, argv, node_name);
// 创建一个节点对象
ros::NodeHandle node;
// TODO 将业务逻辑写在此处

// 开启 ros 的运行时循环
ros::spin();
return 0;
}
  1. CMakeLists.txt 中添加 add_executabletarget_link_libraries
1
2
3
4
5
6
7
8
9
10
# 添加一个可执行程序
add_executable(
demo_publisher1
src/publisher1.cc
)
# 添加该可执行程序的依赖库
target_link_libraries(
demo_publisher1
${catkin_LIBRARIES}
)
  1. CMakeLists.txt文件的find_package中添加demo_msgs的依赖
1
2
3
4
5
6
find_package(catkin REQUIRED COMPONENTS
roscpp
rosmsg
rospy
demo_msgs
)
  1. 创建 Publisher 对象

    1. 导入要发送的消息的头文件

      1
      #include "demo_msgs/Team.h"
    2. 创建对象,并发送消息

    1
    2
    3
    4
    5
    6
    7
    8
    9
    10
    11
    12
    13
    14
    15
    16
    17
    // 创建一个 topic 的名称
    char topic_name[] = "demo_topic";
    // 获取一个 publisher 的对象
    const ros::Publisher &pub =
    node.advertise<demo_msgs::Team>(topic_name, 1000);
    // 创建一个要发送的消息对象
    demo_msgs::Team team;
    // 填充要发送的数据
    team.name = "I'm a team";
    team.leader.name = "AskeyNil";
    team.leader.age = 18;
    team.location.angular.x = 1;
    team.location.linear.z = 2;
    // 使用 publisher 发送该消息
    while (ros::ok()) {
    pub.publish(team);
    }
  2. 编译该节点,在工作空间目录下

1
catkin_make

python版本

  1. package 目录下创建一个名为 scripts 的文件夹
  2. 创建一个名为 publisher1.py 的文件,将以下代码添加到该文件中
1
2
3
4
5
6
7
8
9
10
11
12
13
14
#!/usr/bin/env python
# coding: utf-8

# 导入 rospy 依赖
import rospy

if __name__ == "__main__":
# 节点名称
node_name = "demo_publisher"
# 初始化 ros 节点
rospy.init_node(node_name)
# todo 将业务逻辑写在此处
# 开启 ros 运行时循环
rospy.spin()
  1. 创建 Publisher 对象

    1. 导入要发送的消息的头文件
    1
    from demo_msgs.msg import Team
    1. 创建对象,并发送消息
    1
    2
    3
    4
    5
    6
    7
    8
    9
    10
    11
    12
    13
    14
    15
    # 创建一个 topic 名称
    topic_name = "demo_topic"
    # 创建一个发布者
    pub = rospy.Publisher(topic_name, Team, queue_size=1000)
    # 创建一个要发布的消息
    team = Team()
    # 填充要发布的消息
    team.name = "I'm a team"
    team.leader.name = "AskeyNil"
    team.leader.age = 18
    team.location.angular.x = 1
    team.location.linear.z = 2
    # 使用 publisher 发送该消息
    while not rospy.is_shutdown():
    pub.publish(team)
  2. 给 publisher.py 赋予可执行权限

1
chmod a+x src/demo_topic/scripts/publisher.py

使用 rqt_topic 工具调试

  1. 将当前工作空间的环境变量添加到bashzsh
1
2
3
# 根据使用不同的 shell 使用不同的环境变量,两者选其一
source devel/setup.bash # 使用 bash
source devel/setup.zsh # 使用 zsh
  1. 运行 demo_publisher

    1. c++ 程序
    1
    rosrun demo_topic demo_publisher1
    1. python 程序
    1
    rosrun demo_topic publisher1.py
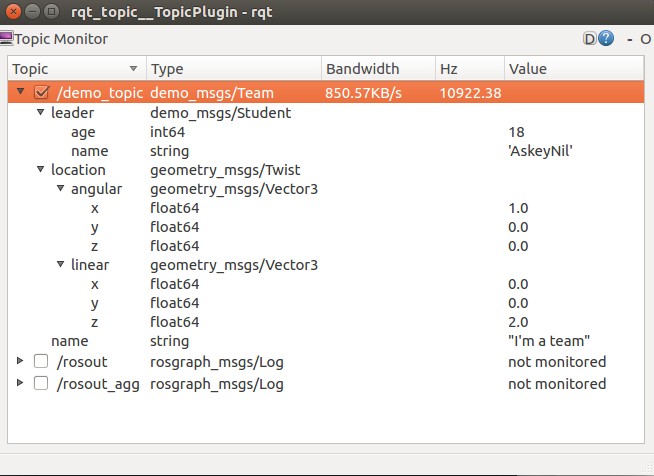
  2. 打开 rqt_topic 工具

1
rosrun rqt_topic rqt_topic
  1. 勾选 demo_topic,结果如下

rqt_topic1

总结

  1. 如果调用别的package中的消息,需要将对应package添加到CMakeLists.txt中即可使用
  2. Python 文件在调用之前一定要给对应的程序可执行的权限
  3. 创建简单ros程序的时候有大致的固定格式,可以使用代码块将其包装起来,下文记录我在vscode中记录的代码块
  4. 注意node_name是一个base name,其中不能包含 /
  5. 注意:如果发送频率太高,缓冲区中的消息大于我们设定的值,本文设置的是1000,则会默认丢弃掉最先发布的消息。

代码块

C++

ros_main

1
2
3
4
5
6
7
8
9
10
11
12
13
14
15
16
17
18
19
20
21
22
23
"ros_main": {
"prefix": "ros_main",
"body": [
"// 导入 ros 头文件",
"#include <ros/ros.h>",
"",
"int main(int argc, char **argv) {",
" // 创建 ros 的节点名称",
" // todo 填写节点名称",
" char node_name[] = \"${1:node_name}\";",
" // 初始化 ros 节点",
" ros::init(argc, argv, node_name);",
" // 创建一个节点对象",
" ros::NodeHandle node;",
"",
" // todo 处理业务逻辑",
"",
" // 进入一个简单的事件循环",
" ros::spin();",
" return 0;",
"}",
]
}

ros_create_publisher

1
2
3
4
5
6
7
8
9
10
11
12
"ros_create_publisher": {
"prefix": "ros_create_publisher",
"body": [
"// 创建一个 topic 的名称",
"// todo 填写 topic 名称",
"char topic_name[] = \"${1:topic_name}\";",
"// 获取一个 publisher 的对象",
"// todo 添加 topic 类型",
"const ros::Publisher &pub =",
" node.advertise<${2:topic_class}>(topic_name, 1000);",
]
}

Python

ros_main

1
2
3
4
5
6
7
8
9
10
11
12
13
14
15
16
17
18
19
20
21
"ros_main": {
"prefix": "ros_main",
"body": [
"#!/usr/bin/env python",
"# coding: utf-8",
"",
"# 导入 rospy 依赖",
"import rospy",
"",
"if __name__ == \"__main__\":",
" # 节点名称",
" # todo 填写节点名称",
" node_name = \"${1:node_name}\"",
" # 初始化 ros 节点",
" rospy.init_node(node_name)",
" # todo 处理业务逻辑",
" # 开启 ros 运行时循环",
" rospy.spin()",
""
]
}

ros_create_publisher

1
2
3
4
5
6
7
8
9
10
11
"ros_create_publisher": {
"prefix": "ros_create_publisher",
"body": [
"# 创建一个 topic 名称",
"# todo 填写 topic 的名称",
"topic_name = \"${1:topic_name}\"",
"# 创建一个发布者",
"# todo 填写 topic 的类型",
"pub = rospy.Publisher(topic_name, ${2:topic_class}, queue_size=1000)",
]
}

附录

创建只发布std消息的节点的完整代码

C++

1
2
3
4
5
6
7
8
9
10
11
12
13
14
15
16
17
18
19
20
21
22
23
24
25
26
27
28
29
#include "std_msgs/String.h"
// 导入 ros 头文件
#include <ros/ros.h>

int main(int argc, char **argv) {
// 创建 ros 的节点名称
char node_name[] = "demo_publisher";
// 初始化 ros 节点
ros::init(argc, argv, node_name);
// 创建一个节点对象
ros::NodeHandle node;

// 创建一个 topic 的名称
char topic_name[] = "demo_topic";
// 获取一个 publisher 的对象
const ros::Publisher &pub =
node.advertise<std_msgs::String>(topic_name, 1000);
// 创建一个要发送的消息对象
std_msgs::String str;
str.data = "I send a message";
// 使用 publisher 发送该消息
while (ros::ok()) {
pub.publish(str);
}

// 进入一个简单的事件循环
ros::spin();
return 0;
}

Python

1
2
3
4
5
6
7
8
9
10
11
12
13
14
15
16
17
18
19
20
21
22
23
24
25
#!/usr/bin/env python
# coding: utf-8

# 导入 rospy 依赖
import rospy
from std_msgs.msg import String

if __name__ == "__main__":
# 节点名称
node_name = "demo_publisher"
# 初始化 ros 节点
rospy.init_node(node_name)
# 创建一个 topic 名称
topic_name = "demo_topic"
# 创建一个发布者
pub = rospy.Publisher(topic_name, String, queue_size=1000)
# 创建一个要发布的消息
string = String()
# 填充要发布的消息
string.data = "I send a message"
# 使用 publisher 发送该消息
while not rospy.is_shutdown():
pub.publish(string)
# 开启 ros 运行时循环
rospy.spin()

创建发布自定义消息的节点

C++

1
2
3
4
5
6
7
8
9
10
11
12
13
14
15
16
17
18
19
20
21
22
23
24
25
26
27
28
29
30
31
32
#include "demo_msgs/Team.h"
// 导入 ros 头文件
#include <ros/ros.h>

int main(int argc, char **argv) {
// 创建 ros 的节点名称
char node_name[] = "demo_publisher";
// 初始化 ros 节点
ros::init(argc, argv, node_name);
// 创建一个节点对象
ros::NodeHandle node;
// 创建一个 topic 的名称
char topic_name[] = "demo_topic";
// 获取一个 publisher 的对象
const ros::Publisher &pub =
node.advertise<demo_msgs::Team>(topic_name, 1000);
// 创建一个要发送的消息对象
demo_msgs::Team team;
// 填充要发送的数据
team.name = "I'm a team";
team.leader.name = "AskeyNil";
team.leader.age = 18;
team.location.angular.x = 1;
team.location.linear.z = 2;
// 使用 publisher 发送该消息
while (ros::ok()) {
pub.publish(team);
}
// 开启 ros 的运行时循环
ros::spin();
return 0;
}

Python

1
2
3
4
5
6
7
8
9
10
11
12
13
14
15
16
17
18
19
20
21
22
23
24
25
26
27
28
29
#!/usr/bin/env python
# coding: utf-8

# 导入 rospy 依赖
import rospy
from demo_msgs.msg import Team

if __name__ == "__main__":
# 节点名称
node_name = "demo_publisher"
# 初始化 ros 节点
rospy.init_node(node_name)
# 创建一个 topic 名称
topic_name = "demo_topic"
# 创建一个发布者
pub = rospy.Publisher(topic_name, Team, queue_size=1000)
# 创建一个要发布的消息
team = Team()
# 填充要发布的消息
team.name = "I'm a team"
team.leader.name = "AskeyNil"
team.leader.age = 18
team.location.angular.x = 1
team.location.linear.z = 2
# 使用 publisher 发送该消息
while not rospy.is_shutdown():
pub.publish(team)
# 开启 ros 运行时循环
rospy.spin()

评论